About the plugin
This page will walk you through the aspects of the plugin. You will learn how to configure it, how to make your own sequences, and use the plugin in general.
The plugin is designed to be used in multiple ways. The most basic usage is as a Docker. To see it, activate the menu Settings – Dockers – Actuator. By default, the Actuator’s docker will show only a single button. By clicking on this button the Configuration window will be displayed.
Have any questions? Refer to the FAQ. Or ask on #support channel in the community.
Actuator is implemented as a standard Docker as the most widget-based plugins of the Krita software. However, you are not limited to just a single Docker. The plugin also supports setting a shortcut for the sequences, organizing the sequences in groups, and showing the Pie Menu to interact with any created group. By making specific group active you can limit the number of sequences displayed on the docker.
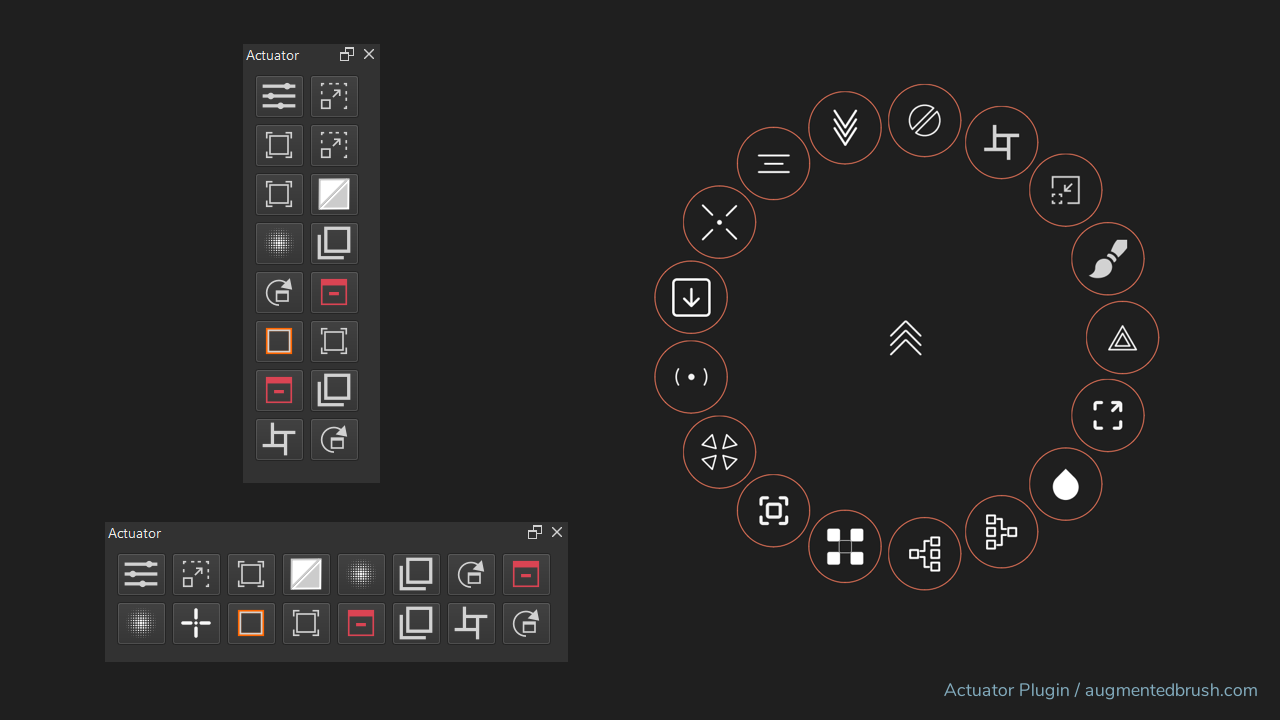
Table of Contents
- Configure the plugin
- Executing the sequence
- Intercepting Filters
- Assign a Keyboard Shortcut to a Sequence
- Custom Script as a Sequence Step
- Useful Sequences
Configure the plugin

To configure the plugin use menu: Tools – Augmented Brush – Actuator – Configure .
Alternatively, you can press the Configure button on the Docker. Btw, the configuration button is always displayed and does not impact sequences in the settings file. The configure button is a separate element.
The Configuration window is separated into three tabs. The Main tab is for general settings. Manage Sequence for doing all the things you need with the sequences. Manage Groups is to organize our sequences into presets and control which of the group will be displayed on the Docker.
Settings Autosave
It is important to know that after every step you do, the plugin will save the applied changes right away. No need to worry about clicking “Save” button all the time.
Main Tab
Action Delay. Every action in a sequence is being executed one after another. However, there are cases when the first action in a sequence takes more time than the second. Due to the multithreaded nature of the Krita application. In this situation, actions will be executed in the wrong order and the desired result will not be achieved. To work around this problem, use the delay to tell the Plugin to wait some after the action was triggered. The number here is in milliseconds.
Icon Size. The size for icons in the docker.
Pie Menu Minimum Radius. Set the minimum radius for Pie Menu if the default one is to small.
Manage Sequences
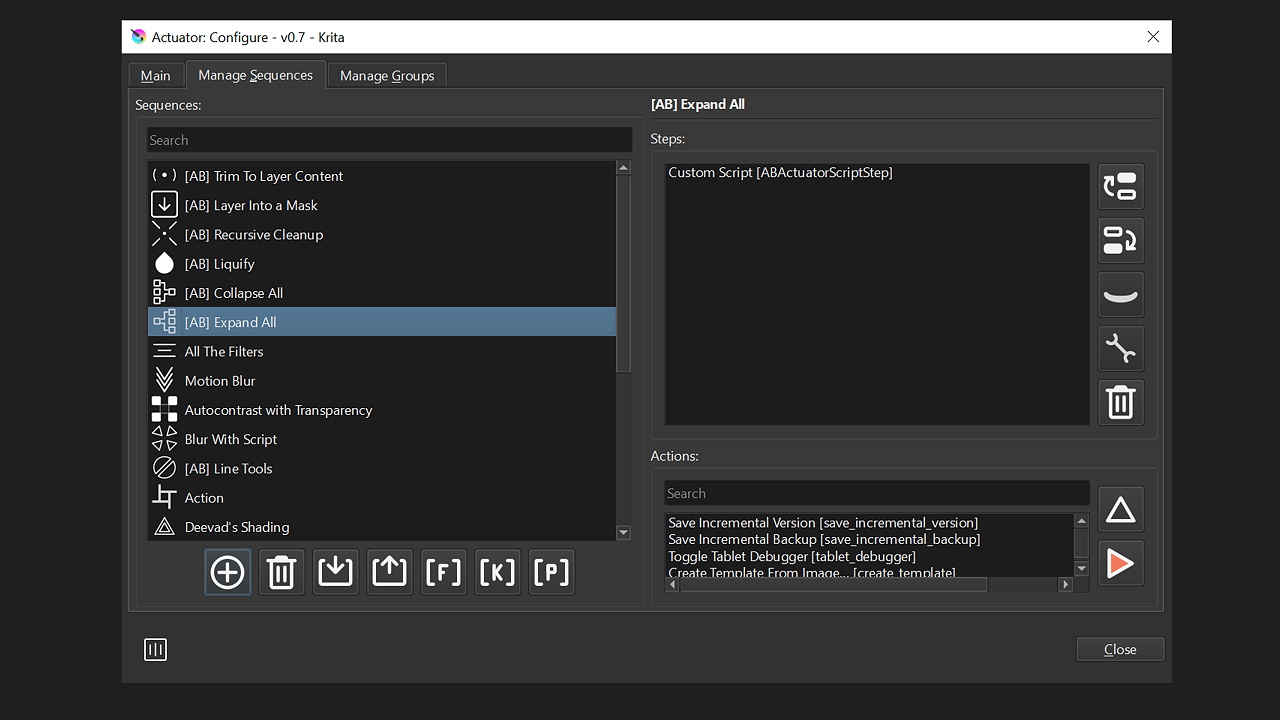
Manage Sequences tab is the working horse of Sequence construction. It is split into three sections. First, the section on the left – “Sequences”, is a sequences list. Every item in a list is the sequence created (or imported) before. All the sequences are also displayed on the Docker for execution. However, if there is an active group, then only sequences from the group are displayed. Second, section: “Steps”. This section displays the list of actions that will be executed in the sequence. The orders of actions in this list determine the order of execution. Third, the section “Actions”, is the actions list that can be used to construct a sequence.
Manage Sequences Buttons
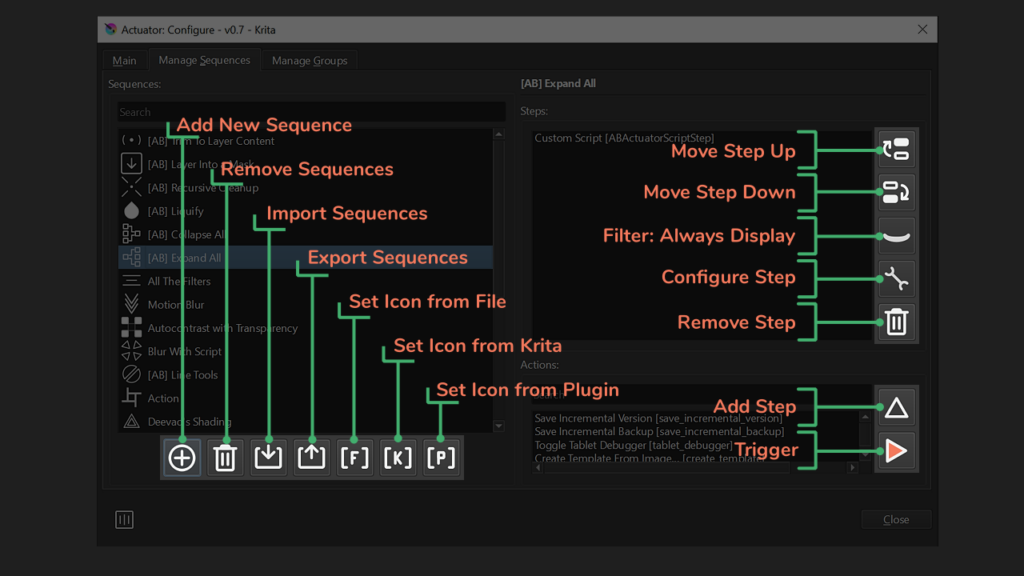
Now, let’s take a closer look at how to manage sequences.
Add Sequence
Add sequence is represented by a circle with a plus icon. By pressing this button Sequences List will add a new empty item. Enter your name and press Enter or click anywhere outside the input box. If you set the name that is already taken new sequence will not be created, however, once you try to add a new sequence again the editor will be filled with the previously attempted name.
Notice, that once you submit the name, the bottom part of the Configuration window will display a small message that the changes were saved to a file.
Setting Icon for a sequence
After you just create the sequence, it will have the default icon. It will look like a diamond with an exclamation mark.
To set a new icon three buttons can be used. In the “Sequences” section, there are three buttons that look like letters in square brackets. The letters are F, K, and P. F – stands for File, K – stands for Krita, and P – stands for Plugin.
Letter F, from “File” will trigger the pop-up dialog for the file selector. Using this dialog you can set the custom icon from the file. The dialog supports two formats: PNG and SVG.
Letter K, “Krita”. All the icons that are associated with an action will be listed in the popup.
Letter P, “Plugin”. Actuator is shipped with a set of default icons to quickly set something other than default Krita icons and not to spend time searching local images.
Edit Sequence
Actually, there is no such thing as editing or not editing the sequence. By selecting a sequence in the list all the required fields and lists are automatically filled with sequence data and ready to be edited. Once you make changes to the sequence they are immediately saved to the settings file.
Note on forcing Krita close. If you interrupt the application’s execution in one way or another the settings will not be saved. You should close the application by pressing the Cross button or using the menu.
Rename Sequence
To rename a sequence, double-click on a name you want to change. Set the name you want and press Enter. New changes are saved right away.
Add new Steps
Once the name is set the sequence can be edited. Use the “Actions” section to find the actions you need and add them to the “Steps” section. To add a new step to a sequence select the item from the list and press the upward pointing triangle icon, or double-click on the list item.
Notice that the “Actions” section also has a right-pointing triangle filled with red color. This is the Trigger button. Click this button to trigger the selected action. It is helpful if you want to learn what the action is doing.
After you do the step adding, the “Steps” section list will be filled with items. These items are steps of a sequence. The order of these items determines the order of execution. That means if you want to blur a vector layer you should have sequences in order “conver_to_paint_layer”, “krita_filter_blur” and not the other way around.
Reorder the Steps
In case you just added a set of steps you know you would need, or the order of execution needs to be changed Actuator provides two buttons for this. In the “Steps” section, they look like two items with the arrow pointing from one to another. The first button shows the arrow up and the second is the arrow down. The first button will move the selected step up by one and the second will move the selected step down by one.
Rename a Step
Actuator has custom action – “Custom Script”. You can use it to make your own steps that execute the script. Sometimes you can have several script steps and it would be convenient to rename the steps as well. You can do it by double-clicking on a step from the “Steps” list.
Notice that part of the name in square brackets will stay unchanged.
Remove the Steps
To remove the selected step press the trash icon in the “Steps” section.
Remove Sequences
A Sequence list allows the selection of multiple items at a time. To remove one or many sequences just select the sequences you need to remove and press the trash icon. The plugin will pop up a confirmation dialog with the list of items to be removed. Press Yes to confirm the operation.
Import Sequences
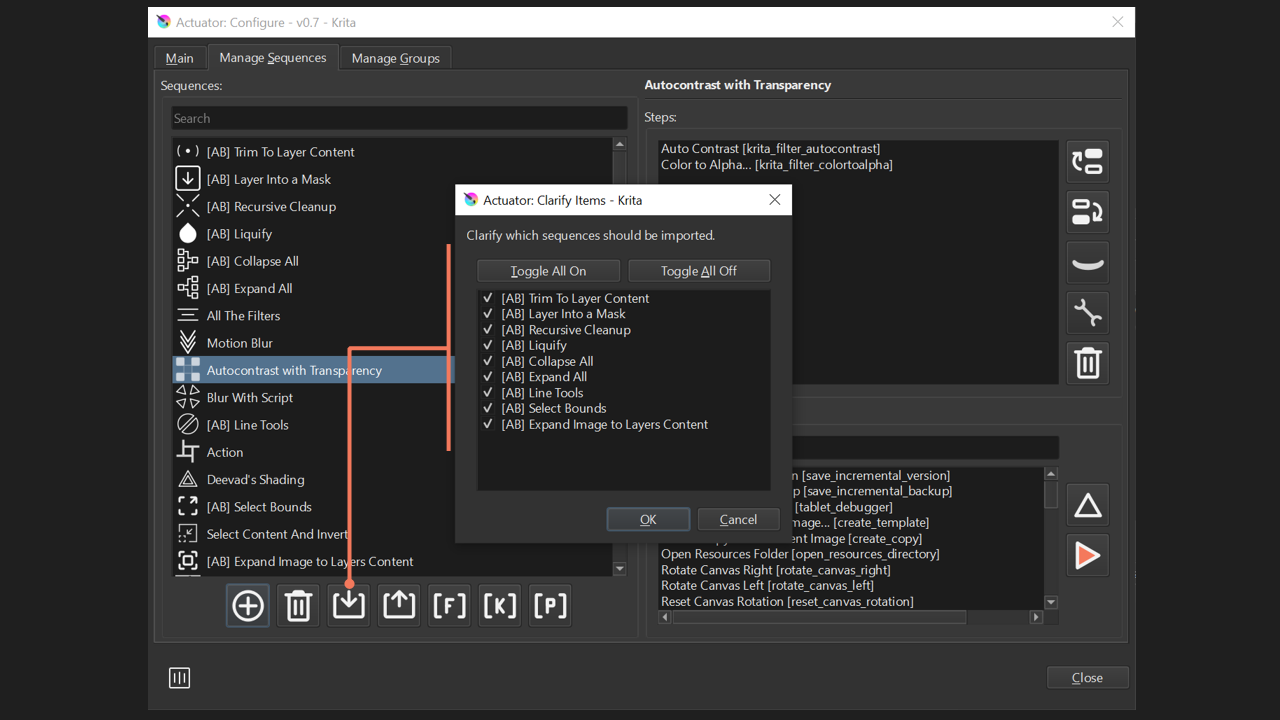
The Import Sequences button is represented as a box with an arrow pointing inside.
Once the Import button is pressed you will be prompted with a dialog to choose the zip archive with existing sequences. Then, a window with a list of sequences to be imported. In this list, you can choose which of the sequences should be imported. Only checked sequences will be added to your collection.
For cases when the names of the sequences conflict with existing ones, the Plugin will prompt with the dialog to clarify further actions. There are three options to address this situation:
- skip – all the sequences from the file that conflict with existing ones will be ignored
- keep – if the names are in conflict the plugin will generate a new name for importing the sequence, hence will keep both sequences
- overwrite – if the importing sequence name matches the exciting one then the existing sequence will be overwritten
The settings apply to all sequences from the importing file.
Note on Script steps. If at least one of the sequences has a step with a Script, the Plugin will additionally prompt a clarification window to proceed. Please be advised that the script inside the Script step is a full Python application and can do virtually everything that Python with standard modules can. So import sequences only from trusted sources.
Export Sequences
The sequences can be also stored in a separate file. Actuator allows packing the sequences in binary format to store them in a single file. The file can be stored or transferred to be used by someone else.
The Export Sequence button is represented as a box with an arrow pointing outwards. To export the sequence, you must first select them in the Sequences list. All selected sequences are packed into a binary file and stored where specified by the file dialog.
Manage Groups
Actuator comes with the functionality to organize your sequences into collections. These collections are called groups. By default there are no groups and all the existing sequences are displayed in the Docker. Once you make at least one group only sequences from the active group will be displayed in the Docker.

The Manage Groups tab is separated into two sections. “Groups” list with the buttons to create, make active, remove, or set the icon for the selected group. The second section lets you select the sequences that will be part of a group.
Create/Remove Group
To make a new group press the plus in a circle icon. Set the name and press Enter. The new group creation has the same behavior as with sequences. If the name is occupied the new group will not be added. Once you press on the plus icon again, the last attempted name will be filled in.
To remove the selected group press the trash icon. A pop-up window will request confirmation. By pressing Yes the group will be removed.
Adding/Removing Sequences to a Group
To add new sequences to the selected group select the icons you want to add and press a triangle icon pointing to the right. Notice that you can select an arbitrary number of icons by holding the Ctrl key. The sequence in the group will be in the same order they were added.
To remove sequences from the selected group, select items in the “Chosen Sequences” section and press the triangle pointing leftward. The sequences will be then moved back to the “Candidates” list.
Reorder Sequences in a Group
To keep things organized it might be needed to reorder sequences in the selected group. To do that just select icons and move them by drag and drop. All the changes will be saved automatically.
Set Active Group
If you have at least one group, the Actuator will show sequences in the Docker only for the active group. To make a group active, select the group and press the circle icon. After you press this button, the icon will change to a filled circle. This is the indicator that the selected group is active.
To distinguish the active group from other groups in the list, the active one will be highlighted with the bold font weight.
Shortcut and Pie Menu
For each group, Actuator will automatically generate a Pie Menu. Once you create a group and restart the Krita you can assign a shortcut and toggle the Pie Menu. The menu will appear at the cursor position.

Set Icon for the Group
Each group can be assigned an Icon. F – for the icon from the file, K – for the icon from Krita and P – for the icon from Plugin.
The icon will be displayed next to the group name and in the middle of the Pie Menu.
Variables
Starting from Actuator version 0.8.0 the artist can create a custom variables that can be used within scripts. Making variables gives the ability to create general purposed script (like exporting selection) and change the destination directory depending on the configuration of the path without need to edit the script every time.
To add variables open the Configuration window and switch to tab Variables

New variable can be added by clicking the Add button. The variable itself consists of three parts: name, type and value. The variables will be stored once the name of the variable is unique. If the names of the variables duplicate the value will no be saved. All the saving happens right away as you type.
By pressing Remove button on each variable you can remove it from your list.
Once the variable is created, it can be accessed with python script. Learn more here.
Executing the sequence
Once the sequence is created, there are four ways to execute it.
The first way is to click on the relative button that Actuator created for the sequence on the Docker after you add the sequence to the group.
The second way is to assign a keyboard shortcut to a sequence.
The third way is to use Krita’s built-in “Actions Pop-Up”. Just press Ctrl+Enter and start typing the name of your sequence.
Forth way is to trigger the sequence with the Pie Menu.
Note that you might need to restart Krita to use shortcuts or “Actions Pop-Up”.
Intercepting Filters
For the majority of built-in filters, the Actuator will intercept “filter action” and execute the filter via script.
Once filter action is added to a sequence and selected, you can set the options that will be used during sequence execution.
Filter actions are special types of actions. When you select a step for filter action two buttons are enabled. “Always Display” and “Configure”. The “Always Display” button has an eye icon (closed or open), and the “Configure” button is depicted with a wrench icon.
By pressing on the wrench icon you can set filter options that will be used when the sequence is executed. The Actuator will pop up with a relative window.
Keep in mind that filter windows have a simplified UI. It is assumed that you will know what values to set in advance. Experiment via Krita’s UI, then just fill in these values into a filter settings popup.
By toggling “Always Display” you communicate to the Actuator whether to pop up the filter dialog every time you run the sequence or not. If the icon shows a closed eye then the step will run silently with specified settings. If no setting is specified, default values will be used. If the icon shows an open eye, then every time you run the sequence the filter pop-up will be displayed to clarify the settings.
To learn the full list of supported filters consult Complete List of supported features.
Assign Keyboard Shortcuts
Starting from Actuator v.0.4 you are able to assign a shortcut key to any sequence or group you create.
By setting the shortcut key to a sequence you will trigger the sequence. By setting a shortcut to a group you will trigger a Pie Menu with the specific group.
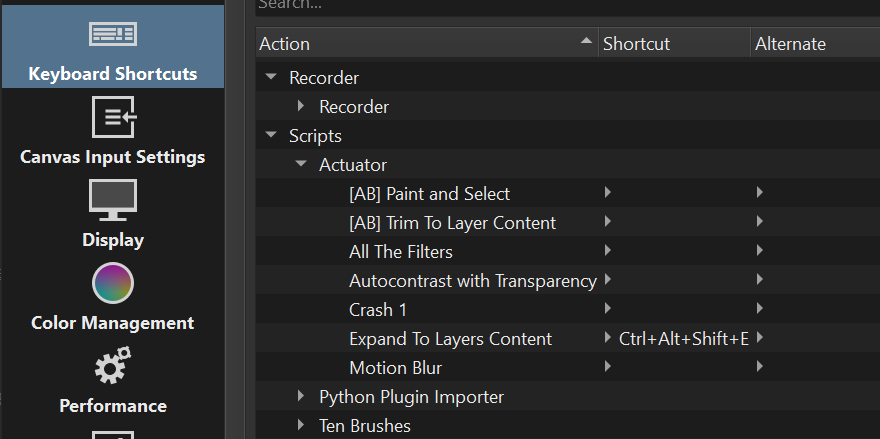
In order to be able to assign a shortcut you have to restart the Krita application after you create a new (or rename existing) sequence or group. Once you restart the application your sequence will be available to set under the Keyboard Shortcut section of Krita Settings. Scroll to section Scripts and look for subsection Actuator. All your sequences and their shortcuts will be listed there.
Custom Script as a Sequence Step
For cases when default actions are not enough, you can add a custom script to a sequence. Having only one step for a script can work as well if you have a script that does everything you need.
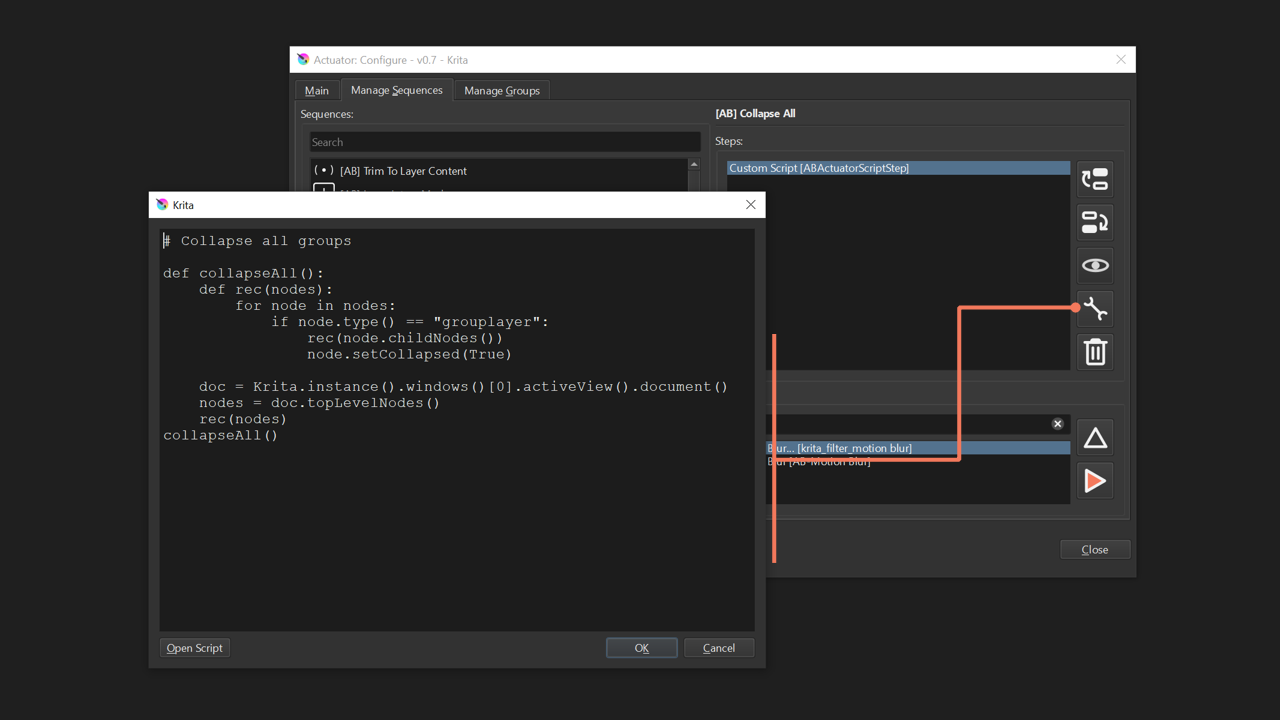
To add the script to a sequence search for ABActuatorScriptStep action from the Actions list. The action you need to add to a sequence is Custom Script action. Select the step (with the script action) you just added. Use wrench button to open a script editor. Put your script in the editor and click OK.
Alternatively you can choose the script for the file. Keep in mind that the content of the file will be copied and stored in the sequences registry independently. If you change the file you need to update the script content as well.
Pay attention to sequences you import from other people. Since there is no malware detection some scripts might be harmful. Only import sequences from trusted sources.
If you want to learn Krita Scripting you can start from reading the Introduction Series here.
Several pieces of advice for making scripts:
- Use the Open Script button to load premade scrip from your file system
- It is better to use the built-in Scripter by Krita application to create and debug the script
- There are no limits on what code can be added, so you can import anything
- Use “from PyQt5.QtCore import qDebug” and “Log Viewer” Docker to print out messages from your script
Note on ABActuatorScriptStep action. This is a special type of action that does nothing. However, it is being treated by Actuator in a special way. Once the plugin encounters this action it will try to extract the script (associated with a step) and execute it. If the script contains the error relevant popup will be displayed so the issue can be addressed.
API
If default capabilities of Krita Python API are not enough. Use Actuator’s API to build your custom functionality.
Useful Sequences
For a comprehensive list of useful sequences refer this page.